
Tuesday, August 19, 2014
Our Old House
We did it!! We bought our first house!! After having the keys for one whole day, we moved in! We were staying at my husband's parent's house until this house was ready for us. So we decided to move out of their hair as soon as possible. Instead of painting, fixing, or remodeling anything before taking up residence, we decided to move in immediately and do these things while living in the house. HA! It hasn't been terrible, but it has tested my patience. Thankfully its all worth it and I'm in the old house of my dreams. So, little by little I will be posting before and after pictures of this great house.
Thursday, August 14, 2014
Expecting...Changes

It is early Thursday morning as I am writing this. Yesterday I did a revamp on this blog site that I haven't had a new post for in a year and a half. I decided to change the name and dedicate it to the little one that is growing inside of me. Yes, I am expecting... a baby girl due in October! We couldn't be more excited! So, with a baby on the way I've had so many thoughts. Good and bad, exciting and nervous and everything in between. I wanted a place to collect all of these thoughts and all of life's moments that are about to be thrown our way. I have a new found love for mommy blogs (for obvious reasons) but I still have a passion for the things I started this blog to begin with. Hopefully, I can combine everything I am passionate about onto one page and post it here.
Tuesday, December 4, 2012
Mama's Swiss Steak
This Swiss Steak Recipe is my family's favorite. Growing up, my father would ask my mother to make it almost every week. I'm sure my mom didn't mind because not only does it satisfy those comfort food taste buds, but it is so extremely simple to make. Unfortunately, I don't have a picture of the meal when it was done. We ate it to quickly for me to snap one. Anyway, here's what you need.
-Crock Pot or slow cooker
-cube steak or round steak that has been tenderized. For this recipe I bought two packages of cube steak. Each package had three large pieces of steak in it.
-1 Family size can of Campbell's Cream of Mushroom soup.
-1tbsp butter
-1tbsp vegetable oil
-1tbsp flour
-salt and pepper
-1 large onion
-1/2 cup water

 |
| Cut your onion in slices then pull apart the layers. Keep the layers in large chunks like this. |
 |
| Fill the bottom of your slow cooker with the onions. |
 |
| Salt and pepper both sides of each piece of meat. I also pound the meat a little more, even tho it is already tenderized. It makes me feel better. |
 |
| Melt butter and oil in pan over med/low heat |
 |
| Start browning the meat. I cook it enough so both sides are brown but the juices still run a little pink. |
 |
| Keep the meat you have browned in a dish for later. |
 |
| When all the meat is browned, add water to the pan and scrape the bottom to get all that yummy goodness off the pan. |
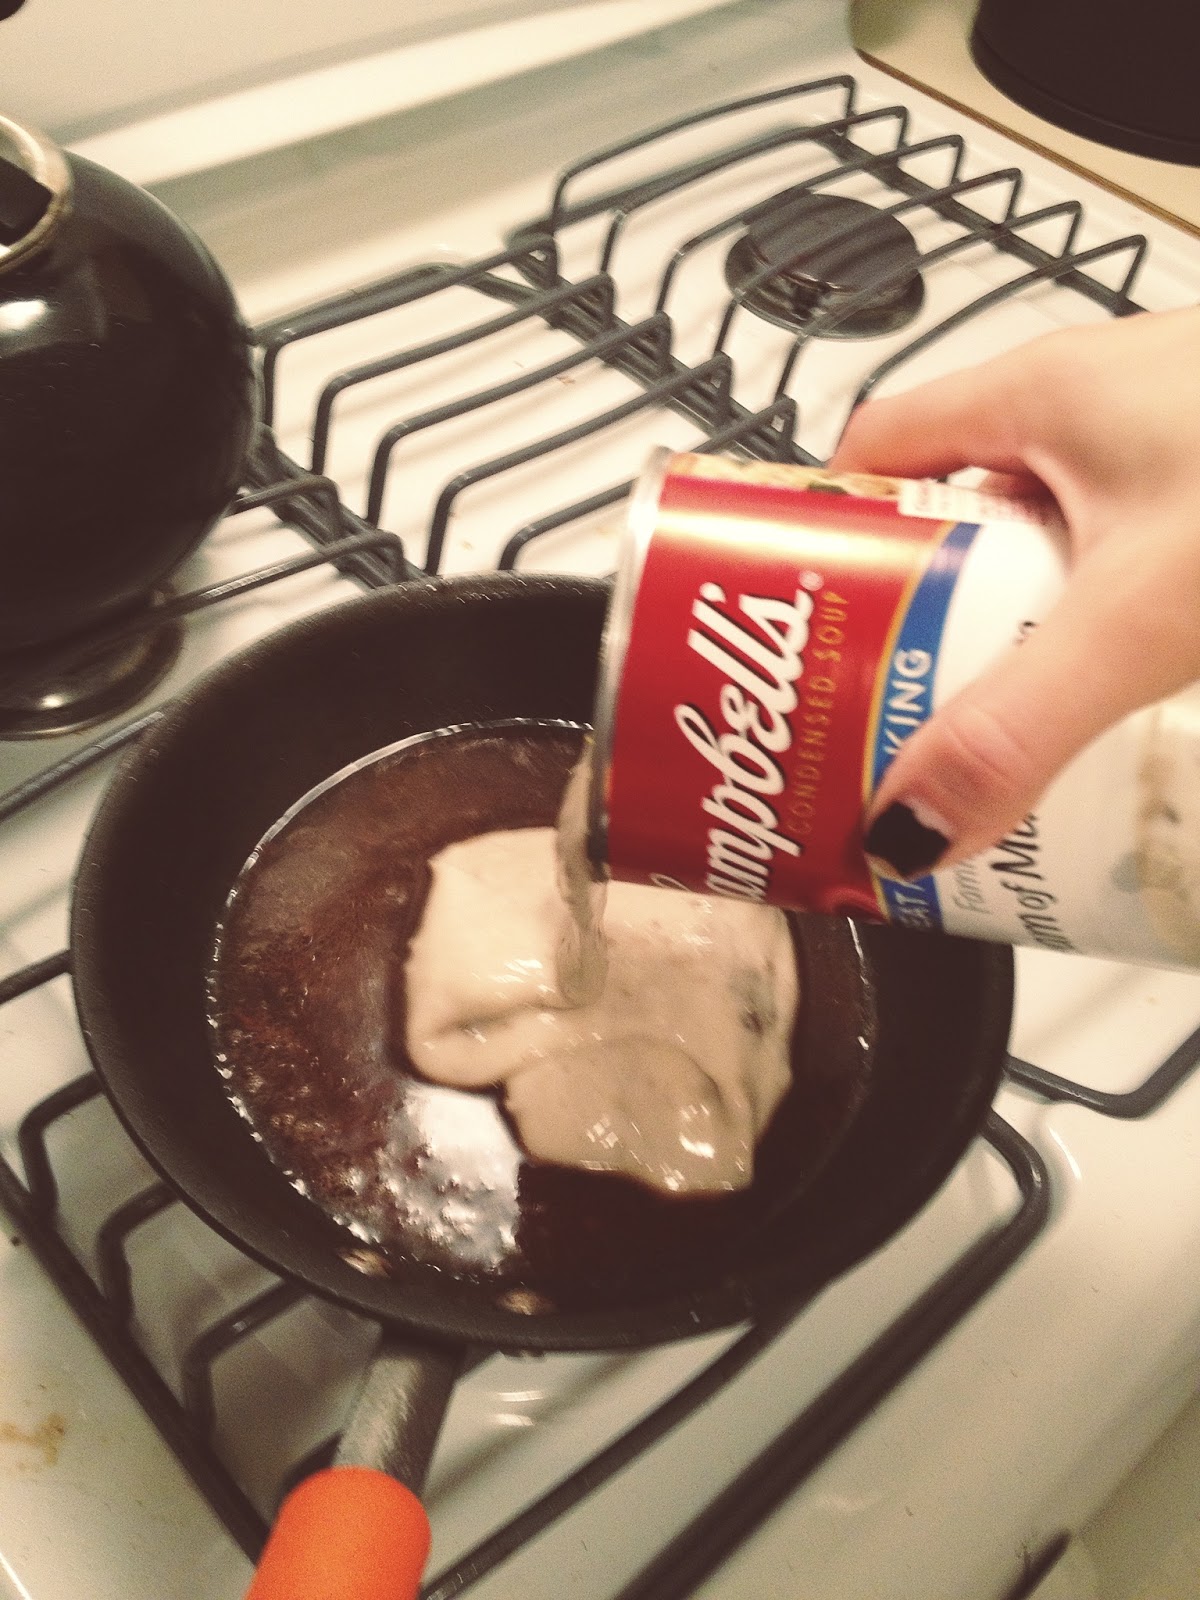 |
| Mix in the soup. |
 |
| Be careful mixing. I had a full pan! |
 |
| Put a layer of meat in the slow cooker over the onions |
 |
| Sprinkle a little flour over the meat. |
 |
| Then, spoon a layer of the gravy mixture over the meat. |
 |
| Repeat the layers of meat, flour, and gravy until you use it all up. |
 |
| Cover and cook on high for 5 hours. If I'm home while the meat is cooking, every so often I shake the slow cooker a little bit. BE CAREFUL! Doing this helps the meat around the edges not to get too done. It just loosens it up a bit. |
Felt Holiday Bows

I had so much fun making these felt bows. They really put me in the holiday spirit. Now, I am so excited to use them in my gift wrapping!
To make these you will need the following:
Sheets of felt in various colors (one sheet makes one bow)
Scissors
Ruler
Needle and Thread
With your ruler measure and cut these strips.
3-10 1/2" by 3/4"
3-9 1/2" by 3/4"
2-8 1/2" by 3/4"
1-3 1/2" by 3/4"
Next, make figure eights with each strip (shown below) This was tricky at first but once you do one you'll have it figured out!
Then, starting with the largest figure eight and work toward the smallest one add one on top of another, stitching between each one. Finally, take the smallest strip and make a circle with it. Fasten it on top of the smallest figure eight (make sure to center it). Tie a knot on the back of the bow with the thread so it all stays together. Thats it! Now you can make these into ornaments, add to a wreath, or top a present off with one! For the original instructions go here. Happy Holidays!! Love, Morgan


 |
| The strips don't have to be perfect, so don't fret it if they aren't exactly straight. example here.. |
 |
| These are the figure eights. The pointier the loops on the ends are, the more realistic the bow looks to the original ones. |
Thursday, November 29, 2012
Recipe: Mexican Wedding Cake

I know Christmas is still um..26 (and counting) days away. But I don't think it's too soon to share my favorite holiday cookie. This is my grandmothers recipe. Enjoy!
1 cup butter
1/2 cup powdered sugar
1 tablespoon vanilla
1 3/4 cup flour
1/2 cup chopped nuts (walnuts or pecans)
1/2 teaspoon salt
Makes roughly 45 cookies
Preheat oven to 350 degrees. Cream butter and sugar together. Work in vanilla, flour, salt and nuts until it becomes a dough consistency. If the dough is too sticky, cool in the fridge for a few minutes. Form small balls by rolling them in your hands. Place on cookie sheet and bake for 20 minutes. Let the cookies cool completely and shake them in powdered sugar. Store in air tight container.


Vintage Fixes Complete
Okay, so remember that awful (sorry grandma) dress from my Vintage Fixes post a couple weeks ago? I finally finished all the sewing to make this dress wearable. I personally happen to LOVE it now! Check it out!


Let me start by restating that in no way am I a seamstress. I know the basics, if that, so any sewing instructions that I give are very unprofessional. The first thing I did to this dress was remove the sleeves. They were very fluffy and I just wasn't feeling them. Off they came, along with the green velvet trim on the front. I also hemmed the length to just above my knees. Next, I decided to turn the dress around and make the front now be the back and have the zipper in the front. I had one more thing to do to "fancy" it up. I wanted to add lace to the back. At first I was just going to at the lace over the top of the fabric that was there. With a little thought I decided to cut the fabric out and replace it with the lace. Now it is see through and definitely updated. I can't wait for a reason to wear this dress!! (holiday party anyone?)
Tuesday, November 27, 2012
Holiday Wreaths: Part Two
A Simple Greenery Wreath


 |
| The making of this wreath is classic and quite simple. I collected sticks and twigs from outside that had fallen off trees and bushes. I purchased miniature pine cones and cinnamon sticks from Hobby Lobby that I also added. Then, I started by placing them all on the wreath. I put everything on the wreath and decide the layout before I start hot gluing anything down. Once I liked the layout of the twigs, mini pine cones, and cinnamon sticks, I started glueing everything in place. I finished by adding two bows that I made from burlap scraps :) and one simple tied bow with ivory ribbon. |
Subscribe to:
Posts (Atom)